Showing posts with label yard. Show all posts

Sunday, May 4, 2014

Pallet Sectional - Final Look, Cost

Ta-dah! Here's the final set up for our pallet sectional. (The project was prompted when a snow storm took out our old deck furniture.) I love that the new set up can seat a bunch of guests for dining or make a cozy place to nap away a lazy afternoon. Below is the cost and material breakdown.
Pallet sectional outdoor


  • 8-wood pallets, 36"x48" each - $0
  • 6 - posts used for backs; scrap pieces from Lowe's - $0
  • 2-Beddinge futon mattresses, 55"x79" each (mattress 4" high, seat depth 31"), included covers - $35, CL
  • 2-vinyl zipped mattress protectors, queen size - $25
  • 1-32 oz 303 Products 30650 High Tech Fabric Guard w/ Water Repellant - $25.75 (paid $3.99 extra for 1-day ship) 
  • 8 - Ullkatus Cushions/Pillows from Ikea, green - $32 (sold in outdoor section, presumably meant for outdoor use)
  • 6 - Gulort cushion/pillows from Ikea - $18 (on clearance, believe they are being discontinued; treated w/ waterproofing spray)
  • Total Cost: $135.75

Sets with similiar seating capability run in the range of $1,500-2,500. So I'm feeling good about our final costs. Plus, we went big. If you were doing, say, a loveseat, you could spend much less.

Other cushion ideas include crib or foam mattresses or old couch cushions. You could even look for actual outdoor cushions at Big Lots or end-of-season sales. I hear some people do that; use things for their intended purposes. :) I wouldn't know anything about that, though. I do know that I'm really happy basically having two beds on my deck. So is our dog Buddha.


Friday, April 18, 2014

Making Futons Rain-Ready

Two Beddinge futons for very little scratch--check! Pallets lined up and ready for use as a sectional--check! Now, making it so that the futons would survive the outdoors...a little trickier. 

There are sources for futon covers made in water resitant fabrics. The cheapest I found was the Futon Shop, at $215 for a queen size. (Beddinge is slightly longer than a regular full.) That's way over budget BEFORE I times it by two. 

Plus, my CL futon finds had each come with covers. It made sense to try to reuse those. I crossed ideas such as fashioning cushion covers from picnic blankets, drop cloths or duck cloth off my list. Now it was all about waterproofing what I had. Time to get creative, do some research and keep my fingers crossed.

I orded two vinyl, zipped queen mattress covers on Amazon for a total of $25 (from Shop Bedding). This was a little more than the cost of the plastic ones, but from what I read would last longer and was less likely to tear. I looked for covers that claimed to block allergens, under the theory that they'd block my mattresses from mildew. We will see. 

When it came to waterproofing the fabric, the search was a little more daunting. Ever heard of fluorpolymer? Nope? Neither did the thousands of people who sustained respitory injuries by inhaling it when they used waterproofing sprays. I'm sure there are safe useage guidlines, but I'd like to pass on the poison.

And now the questions. There are a number of 100% wax solutions, DIY and premade. But, will wax leave the fabric to stiff? And how long would it take to wax two big futons??? Nikwax offers a non-fluorpolymer spray, but how many buckets of that will I need? A friend suggested just using fitted sheets and pulling off when it rains, but it seems a shame to not use the covers which of course will fit perfectly and look much more put together. Ok, back to the blogosphere to look for a solution.

The Great (Outdoors) Cushion Search

Getting pallets to create an outdoor sectional was easy and free. A local farmer posts an ad on Craigslist every time he has some to be picked up, about once a week. The tricky part was deciding what to do for cushions. If you've looked into it, than you know that outdoor foam is super expensive. I would have spent over $300 for two bottom cushions the size I needed, and still needed to come up with covering.

Thus began an OCD CL search, along with research into how other people handled the outdoor cushion on a budget dilemma. (I know...first world problems.) Daily I looked for foam mattresses or mattress covers, twin mattresses, futons. Anything I could possibly convert for my uses. 

I was excited to find a Beddinge futon for $35 just up the street from me. At 55" x 79", it was near perfect. I told the seller I'd pay full price for just the mattress and he agreed. I thought maybe I'd cut the mattress in half and use it for my bottom cushions, figuring out the backs later, or perhaps forgoing them.

Of course, this plan didn't stop me for searching for another Beddinge; how much cooler would it be to have two futons for lazing around on outside? I lucked into somebody giving one away for FREE. He even loaded it in my car and everything. I <3 craigslist.="" nbsp="" p="">

Both came with covers, so that's another item off the list. They don't match, one is a gray/black cotton cover with a quilted look to it (pictured below, right). The other is a charcoal gray tweed-look fabric. I'm pretty sure we can make it look intentional though and make use of both.
Now, to figure out how to water proof them...


Sunday, April 13, 2014

When Life Gives You Snow, Make New Furniture

Once upon a time, we had a patio canopy that looked like this: 


We entertained there often, it got a lot of use. However, the canvas roof was just as hard to take on and off as you might imagine. So, two winters in a row, we rationalized leaving it on. Until the day came that it looked this:


Kind of defeats the whole purpose of living in Virginia. Oh, and in case you're wondering what happend to the glass table underneath of it...

We went round and round on how to best replace our patio set-up. Build a pergola from scratch? Find another canopy? It crossed our minds to get a "conversational set," but the price tag scared us off. Plus, the table base and chairs had survived, so it seemed silly to spend $1,000+ when we could surely work with what was left.

Eventually, we decided to go the low budget--I mean upcycle--route. Presenting....drum roll....the table made from leftover pantry doors and a strip of wood from our old deck (it rests on base from old table):
To fill the door knob holes, I just used votive holders left over from our wedding.  **Note, I may be a border line hoarder. But stuff just keeps coming in handy, so it seems justified thus far.** 

The hinge is an experiment; if we like how it looks, we may make it so one side can fold up when we have a smaller group. The deck strip was added from necessity, it was needed for width, but it became our favorite part of the whole design. Adds some contrast and depth. 

I added a coat of paint to the doors and stained the raw edge of the wood. A few coats of poly will go on this week. It took my husband about 30 minutes to put together, and I've spent about the same amount of time with painting so far. 

It's already passed the "Cook Out and Cards Against Humanity" test: 

For seating, we are doing a hybrid of a DIY pallet sectional and some of the chairs from the old table. It's not blog-ready yet, but I'll post once it is. Anybody else furnishing their outdoor space? Any secrets for doing it on a budget? 


Friday, September 6, 2013

Bullets to Bench (After)

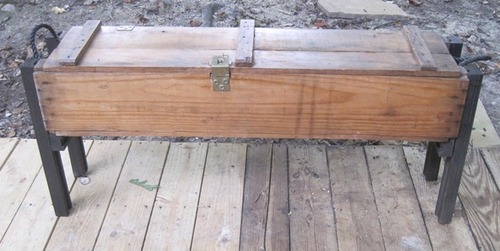
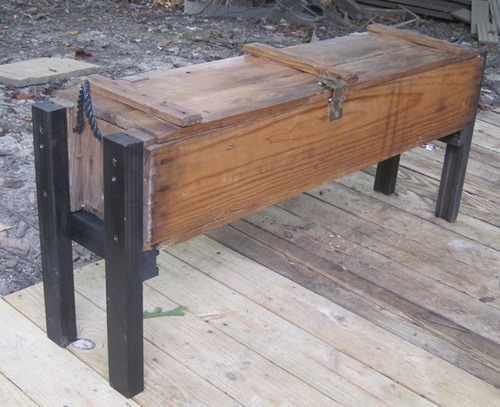
I'm really happy with how the ammunition box upcycle went.  Here's the final product:

image

image

To get the height, we measured where other deck chairs fell and made my son pretend sit on it as we held it just to be sure (that part wasn't very scientific, but it was funny to watch).  After putting the legs on each side, we decided crossbars that connected the legs and cradled the box would add some extra support.  End result is a rustic look that I like, plus it serves double duty as storage and cost next to nothing:

  • Ammunition Box - $5 at yard sale
  • Spray Paint - $1 at ReStore (aka, best place on earth for scavengers)
  • Poly - $0 left by previous homeowner
  • Legs - $0 found wood as we cleaned the garage, prob from previous owner

So, under $10 for our new "custom" bench.  Plus, was nice bonding for the hubby & I.  The parts involving power tools were all him!  I'm the scavenger & idea person. :)  Ok, time to go test out the new bench.  Have to see if it can hold my weight along with a frosty Hoptober.  (Yikes, is it REALLY time for fall beers already???)

Sunday, September 1, 2013

Bullets to Bench (Before)

I'm really happy with how the ammunition box upcycle went.  Here's the final product:

image

image

To get the height, we measured where other deck chairs fell and made my son pretend sit on it as we held it just to be sure (that part wasn't very scientific, but it was funny to watch).  After putting the legs on each side, we decided crossbars that connected the legs and cradled the box would add some extra support.  End result is a rustic look that I like, plus it serves double duty as storage and cost next to nothing:

  • Ammunition Box - $5 at yard sale
  • Spray Paint - $1 at ReStore (aka, best place on earth for scavengers)
  • Poly - $0 left by previous homeowner
  • Legs - $0 found wood as we cleaned the garage, prob from previous owner

So, under $10 for our new "custom" bench.  Plus, was nice bonding for the hubby & I.  The parts involving power tools were all him!  I'm the scavenger & idea person. :)  Ok, time to go test out the new bench.  Have to see if it can hold my weight along with a frosty Hoptober.  (Yikes, is it REALLY time for fall beers already???)

Monday, June 3, 2013

Dirt+Rocks+Sweat = Patio

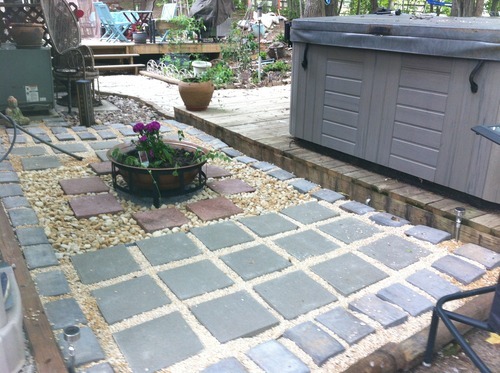
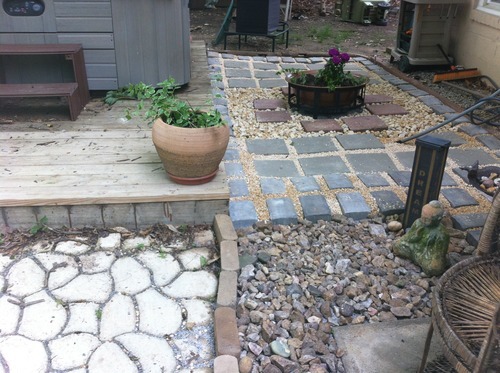
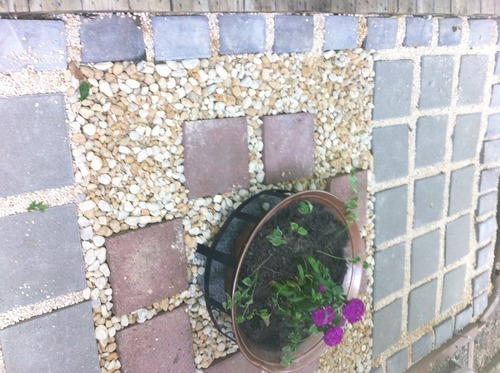
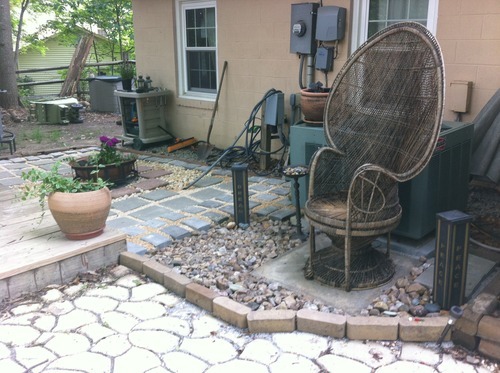
One of my last big yard projects for the season is now off the to-do list! 30 bags of crushed gravel, 86 pavers, 12 bags + 2 wheelbarrows of rocks and a converted fire pit planter later, we now have an attractive rock garden/patio area next to the hot tub instead of a pile of muddy gook. Ok, to count the new patio area as done, I'm cheating and considering adding lattice with climbing flowers to cover up the hose & mechanical area as a separate project! So, ignoring that part...here's some after pics:

image

image

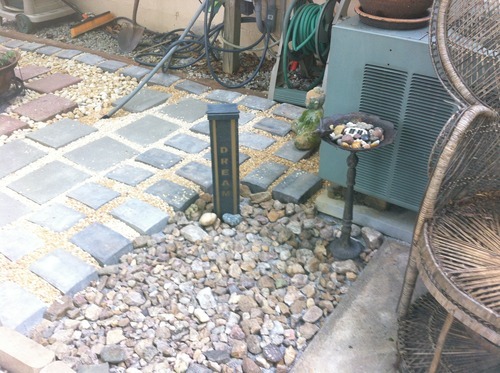
The rocks leading into the area were either painstakingly collected from around our yard (attacking ants be damned!) or were gathered during my cross country trips--aka, the pretty rocks.image

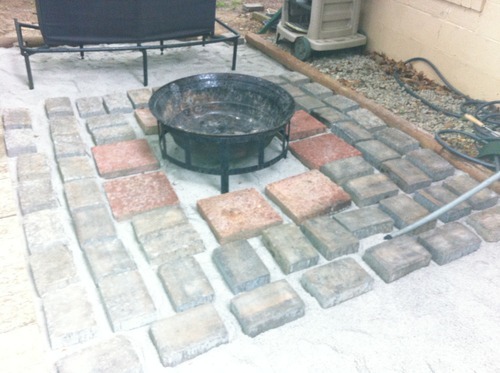
Used pea gravel in between the outer pavers and river rocks in the center. Underneath it all is crushed gravel. The center planter is an upcycled fire pit. Painted with hammered copper spray paint to pretty it up and drilled a few holes to prevent it from becoming a swampy mosquito incubator.

image

image

The wicker chair has since become a fun aubergine. Will post updated pics AFTER I get the lattice over that mess of wires and hose. As you can see, we also need a longer whip (that big, ugly gray thing smack dab in the middle of the patio) for the hot tub so we can bury the line. The contractor who moved it for us unfortunately wasn't super good at finishing up HIS to do list. But, still SO much better than where we started from, I can definitely live with this stage of progress for the time being.

We've come a long way from having one lonely hot tub platform on the hill surrounded by dirt, and it's been fun watching the backyard slowly transform into a sanctuary bit by bit. Not be cliche, but feel like we appreciate it much more since our sweat (& the occasional blood and tears) are part of each improvement. 

image

Thursday, May 30, 2013

PIP, Patio in Progress

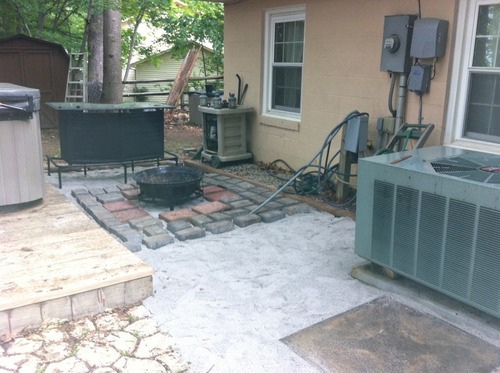
One of these days, I'll remember to take before pictures. In this case, it would have shown an uneven pit of clay, dirt and rotting leaves languishing next to our hot tub. So picture that as the starting point. With the help of my very motivated MIL, we've taken some big steps towards my vision for that mud pit:

image

This is post raking, covering with weed barrier and filling with 30 bags (150 cubic feet) of paver base. We went extra thick with it so it could also level the ground w/o the need for digging. As you can see, there's some work to go--more pavers needed and then we'll fill in between with pea gravel. The now firepit will receive a coat of hammered copper paint and find new life as a garden/focal point. The bar at the end will remain a bar, of course. :) Here's a closer look:

image

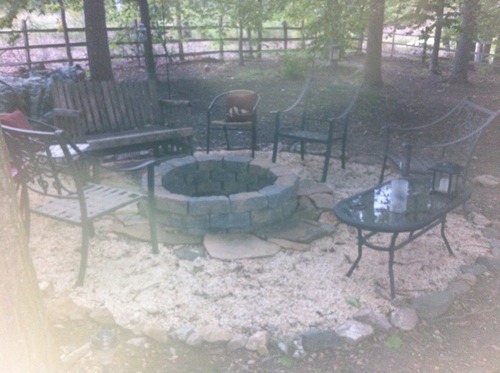
Looking forward to wrapping this up, as it's my one big yard project for the season. Ok, that and the stone fire circle, but that's already checked off the list: 

image

It's like we get to camp in our own backyard, except instead of crawling into a tent when we leave the fire, we curl up in pillow-top, king size goodness. With no bugs.